
IPv6 in AWS with CDK
March 23, 2023Motivation
IPv6 is the latest version of the Internet Protocol (IP), designed to replace IPv4, which is the most widely used protocol on the internet. While IPv4 has been in use for many years, it is becoming increasingly limited due to the finite number of addresses it can provide. As a result, many organizations, including Amazon Web Services (AWS), are transitioning to IPv6 to take advantage of its improved scalability, security and flexibility. It’s no surprise that our customers as well require IPv6-ready set-ups for their workloads, and while AWS services generally support IPv6 out of the box nowadays, CDK support for IPv6 is still a bit lacking in a few places.
In this blog post we will explore how to set up a VPC with CDK, so it can host IPv6 enabled EC2-based workloads.
From 4 to 6
Let’s have a look at a typical IPv4 set-up as we know it:
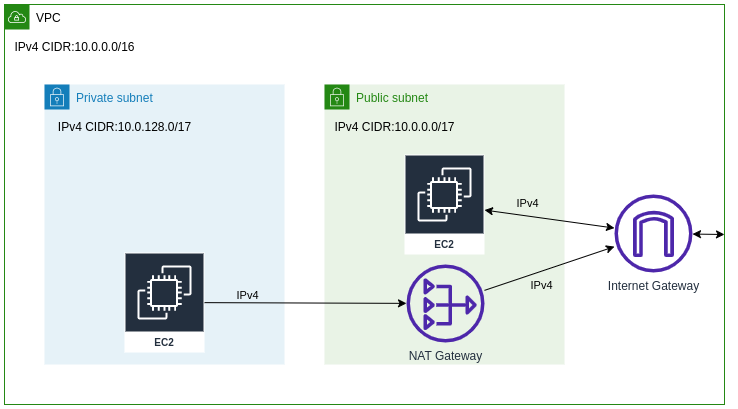
which is what we get by default from
new ec2.Vpc(this, "Vpc", {
  maxAzs: 1,
  subnetConfiguration: [
    { name: "Public", subnetType: ec2.SubnetType.PUBLIC },
    { name: "Private", subnetType: ec2.SubnetType.PRIVATE_WITH_EGRESS }
  ],
});
The AWS approach to enabling IPv6 in VPCs is called dual stack, which means that you will be able to use both IPv4 and IPv6 protocols in parallel. It should be mentioned that you can realize IPv6-only set-ups in your subnets with newer nitro-based instance types. However, if you want to connect to the internet and be able to communicate with the vast amount of still existing IPv4 only services, the dual stack approach is what you need.
So how does such a dual stack set-up look like?
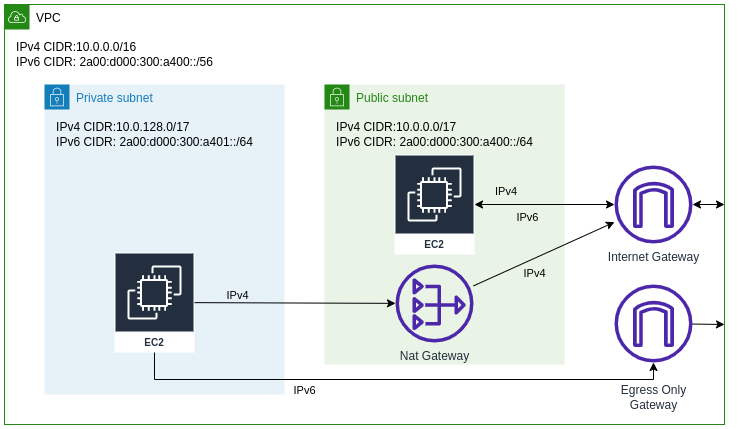
Note that for the private subnet’s IPv6 traffic an egress-only gateway is being used instead of a NAT gateway. This is due to the idea of IPv6 that every device on the internet should have its own publicly routable IP address. In the long run this can help reduce costs by eliminating the need for network address translation (NAT). With IPv6, each instance can have its own public IP address, allowing for direct communication between instances and the internet without the need for a NAT gateway. To still keep the security that NAT gateways provide, in an IPv6 enabled VPC, an egress-only gateway (which will just block connections from the outside) is being used for IPv6 traffic to complement the existing set-up.
So how do we get a configuration as shown in the 2nd picture?
- We request an IPv6 CIDR block for our existing VPC (with AWS we will be able to
request up to five
::/56address blocks per VPC). - We assign one
::/64sub-block (with 4294967296^2 IP addresses) of the requested CIDR block to each subnet in our VPC. - For our public subnets we create IPv6 routes to the internet via our existing internet gateway.
- For our private subnets we create an egress-only gateway and then route all traffic to the internet there.
This is how it could look like in CDK:
class Ipv6Vpc extends ec2.Vpc {
  public egressOnlyInternetGatewayId: string;

  constructor(scope: Construct, id: string, props?: ec2.VpcProps) {
    super(scope, id, props);

    Tags.of(this).add("Name", this.node.path);

    // associate an IPv6 ::/56 CIDR block with our vpc
    const cfnVpcCidrBlock = new ec2.CfnVPCCidrBlock(this, "Ipv6Cidr", {
      vpcId: this.vpcId,
      amazonProvidedIpv6CidrBlock: true,
    });
    const vpcIpv6CidrBlock = Fn.select(0, this.vpcIpv6CidrBlocks);

    // slice our ::/56 CIDR block into 256 chunks of ::/64 CIDRs
    const subnetIpv6CidrBlocks = Fn.cidr(vpcIpv6CidrBlock, 256, "64");

    // associate an IPv6 CIDR sub-block to each subnet
    [
      ...this.publicSubnets,
      ...this.privateSubnets,
      ...this.isolatedSubnets,
    ].forEach((subnet, i) => {
      subnet.node.addDependency(cfnVpcCidrBlock);
      const cfnSubnet = subnet.node.defaultChild as ec2.CfnSubnet;
      cfnSubnet.ipv6CidrBlock = Fn.select(i, subnetIpv6CidrBlocks);
      cfnSubnet.assignIpv6AddressOnCreation = true;
    });

    const addDefaultIpv6Routes = (
      subnets: ec2.ISubnet[],
      gatewayId: string,
      routerType: ec2.RouterType
    ) =>
      subnets.forEach((subnet) =>
        (subnet as ec2.Subnet).addRoute("Default6Route", {
          routerType: routerType,
          routerId: gatewayId,
          destinationIpv6CidrBlock: "::/0",
          enablesInternetConnectivity: true,
        })
      );

    // for public subnets, ensure they have a route to the internet gateway
    if (this.internetGatewayId) {
      addDefaultIpv6Routes(
        this.publicSubnets,
        this.internetGatewayId,
        ec2.RouterType.GATEWAY
      );
    }

    // for private subnets...
    if (this.privateSubnets.length == 0) {
      return;
    }

    // ...ensure there is an IPv6 egress gateway...
    const egressIgw = new ec2.CfnEgressOnlyInternetGateway(
      this, "EgressOnlyIGW", { vpcId: this.vpcId }
    );
    this.egressOnlyInternetGatewayId = egressIgw.ref;

    // ...and ensure they have a route to the egress gateway
    addDefaultIpv6Routes(
      this.privateSubnets,
      egressIgw.ref,
      ec2.RouterType.EGRESS_ONLY_INTERNET_GATEWAY
    );
  }
}
In the above code note that the subnets will not only receive an IPv6 CIDR block each, they are also set to automatically assign an IPv6 address to resources with a network interface created inside the respective subnet from now on.
Great! Can I launch an EC2 instance and have it communicate with the web over IPv6 already?
With CDK not quite yet, but we are almost there.
The security group the ec2.Instance construct creates for an EC2 instance by default
will not have the necessary rule to allow all outgoing IPv6 traffic to the internet
as we are used to with IPv4, so we have to create our own security group instead:
class Ipv6Instance extends ec2.Instance {
  constructor(scope: Construct, id: string, props: ec2.InstanceProps) {
    const securityGroup = props.securityGroup
      ? undefined
      : new ec2.SecurityGroup(scope, `${id}:InstanceSecurityGroup`, {
          vpc: props.vpc,
          allowAllOutbound: true,
          allowAllIpv6Outbound: true,
        });

    super(scope, id, { securityGroup, ...props });
    if (securityGroup) {
      Tags.of(securityGroup).add("Name", props.instanceName || this.node.path);
    }
  }
}
With this in place, we can now start our first IPv6 enabled EC2 instance:
    const vpc = new Ipv6Vpc(this, "Vpc", {
      maxAzs: 1,
      subnetConfiguration: [
        { name: "Public", subnetType: ec2.SubnetType.PUBLIC },
      ]
    });

    const instance = new Ipv6Instance(this, "Instance", {
      vpc,
      vpcSubnets: {
        subnetType: ec2.SubnetType.PUBLIC,
      },
      instanceType: new ec2.InstanceType("t3.micro"),
      machineImage: new ec2.GenericLinuxImage({
        "eu-central-1": "ami-0d1ddd83282187d18"
      })
    });
    instance.connections.allowFrom(ec2.Peer.anyIpv4(), ec2.Port.tcp(22));
    instance.connections.allowFrom(ec2.Peer.anyIpv6(), ec2.Port.tcp(22));
and connect to it via SSH:
Welcome to Ubuntu 22.04.1 LTS (GNU/Linux 5.15.0-1028-aws x86_64)

ubuntu@ip-10-0-99-126:~$ ip addr show dev ens5
2: ens5: <BROADCAST,MULTICAST,UP,LOWER_UP> mtu 9001 qdisc mq state UP group default qlen 1000
    link/ether 02:e6:50:6a:19:58 brd ff:ff:ff:ff:ff:ff
    altname enp0s5
    inet 10.0.99.126/17 metric 100 brd 10.0.127.255 scope global dynamic ens5
       valid_lft 3488sec preferred_lft 3488sec
    inet6 2a00:d000:300:a400:afad:afad:afad:afad/128 scope global dynamic noprefixroute
       valid_lft 408sec preferred_lft 98sec
    inet6 fe80::a0:fe80:fe80:1971/64 scope link
       valid_lft forever preferred_lft forever
We can see that while the instance’s network interface does not know its public IPv4 address as it is being tunneled to the private IPv4 address, the public IPv6 address is directly assigned to the interface.
And here is our proof of connectivity:
ubuntu@ip-10-0-99-126:~$ ping -c1 spiegel.de
PING spiegel.de (128.65.210.8) 56(84) bytes of data.
64 bytes from 128.65.210.8 (128.65.210.8): icmp_seq=1 ttl=52 time=2.02 ms

--- spiegel.de ping statistics ---
1 packets transmitted, 1 received, 0% packet loss, time 0ms
rtt min/avg/max/mdev = 2.023/2.023/2.023/0.000 ms

ubuntu@ip-10-0-99-126:~$ ping -c1 heise.de
PING heise.de(redirector.heise.de (2a02:2e0:3fe:1001:302::)) 56 data bytes
64 bytes from redirector.heise.de (2a02:2e0:3fe:1001:302::): icmp_seq=1 ttl=52 time=2.54 ms

--- heise.de ping statistics ---
1 packets transmitted, 1 received, 0% packet loss, time 0ms
rtt min/avg/max/mdev = 2.538/2.538/2.538/0.000 ms
Conclusion
We have seen how to equip a VPC in CDK with everything needed to host EC2-based workloads. We have also examined an example construct where the default CDK security group would not let us connect to the internet, and how to fix it. You should be able to apply this to other resource types as well now. For more information on everything IPv6 on AWS have a look at the “IPv6 on AWS” whitepaper.

Boris is Co-founder and Cloud Consultant at superluminar. He writes about AWS-specific topics here.